To begin, this job was supposed to have been started earlier in the summer, before the heat arrived. But we were so busy with previously scheduled work that we couldn't get to it until July, and by then the temperature was in the upper nineties, and it felt as though the humidity was, too.
The supply truck dropped off the load in the driveway, and around here, nothing is ever easy. Very few houses in this area, especially around the lakes, have direct access to the back yard, where most decks are built. Therefore, it is necessary to hand-carry everything around to the back of the house...in 90+ degree heat.

And if that weren't enough, the material NEVER comes stacked in the order in which you are going to use it. The largest planks, for the joists, always seem to be on the bottom.
The area for the new deck was an odd shape. It was fairly square from the room extension on the left, up to just past the patio light. From there, it angled back about 20 degrees, over about 4-feet, and then followed the angle of the sun room. You'll notice, that we hadn't yet installed the new windows in the sun room, but those were discussed in the last post. A piece of siding had already been replaced by the owner, and this is where we started removing the sill fascia board to expose the sill behind it, to make sure there wasn't any hidden damage there.

The new deck had to be designed in such a way as to meet all the unusual angles, and end up with a stairway coming down onto the flagstone patio shown in the picture above.
Before we begin to build any attached deck, the preparation work has to be done...something that many amateur builders never think about. The very first thing is to protect the sill of the house, which requires that flashing be installed against the sill, extending up under the siding at least two inches, and extending down over the sill at least an inch. A ledger should NEVER Be installed over the fascia board!

Where there was an access door, the flashing had to be trimmed around and over it to allow drainage. Any seams where the flashing ends overlapped were covered with a special rubberized tape that will never dry out or let loose. The yellow wire was our extension cord, which was plugged into an outlet in the crawl space.

After the sill was protected properly, we attached the ledger boards. And as per code, they are attached with TWO 1/2-inch lag bolts for every linear foot of ledger. To avoid conflicts with the joists, we marked the joist locations out ahead of time, and then installed the ledger bolts between the marks.
We have seen so many decks installed improperly, some with only deck screws holding the ledgers in place...even on balcony decks...where if it ever let loose, people would be seriously injured. Please pay attention: deck screws only have a sheer strength of approximately 125 pounds. By the time you add the weight of the deck, and then figure the maximum number of people who could potentially be on that deck at one time, there is NO WAY that deck screws are going to hold all that weight!
Not only are such building practices ignorant and irresponsible, but the contractors who build such things could never survive the potential lawsuits over injuries resulting from such ignorance! Not only the contractor but the homeowner as well, could get sued by his guests over such an accident!
Our decks were designed according the the standard building codes, and even beyond! We always figured the maximum load that could be on them, and built them accordingly. Things like holiday parties, graduation parties and other things can add tremendous strain to decks. Imagine a graduation party with 30 kids out there dancing on your deck, bouncing up and down with forces far beyond just dead weight! Could your deck withstand that? Think about it!
Code also says that the frost line in this part of the country is 19 inches deep. and yet I see decks built time after time on nothing more than temporary pier blocks, like little pyramids. Ground shifts even when it isn't frozen, and before long those temporary blocks are going to move, and cause the deck supports to become out of alignment and become unsafe to hold their rated weight, or even to pull away from the building.
Our building policies have always been that anything attached to a structure should be built with the same methods (or better) than the structure itself! That means properly sized footings to support the weight of the deck and it's potential occupants. We used 12-inch diameter Sonotube forms dug to the required depth to meet or exceed code.

All forms are laid out with either string lines or a laser, and centers are within a quarter-inch of being "dead-on" with the centers of the support posts to be installed. During the pouring of the concrete, we install L-shaped foundation anchor bolts into the concrete at the center point. The concrete is built up slightly (about a half-inch) in the center to allow for rain to drain off, while the edges are always kept to ground level to allow easy mowing over them, so that no extra trimming needs to be done. When ready, we attached heavy galvanized commercial post bases to the bolts, which serve the purpose of holding the bottom of the posts to the concrete footing, as well as to allow water to drain away from the bottom of the post rather than wick up into the grain. This greatly extends the life of the support posts.
A curious thing happens to large flat expanses of building materials, something which few builders think about. They often design decks, carport roofs and other structures to support the weight that will be "on" it, and yet they forget about the affects of winds coming up underneath it. We have seen first-hand many patio and carport roofs, as well as some decks that were caught in tornadic winds, and flipped up over the structure to which they were attached, simply because the builder forgot to anchor them down!
In this part of the country we are subject to tornadoes. In other parts of the country it can be straight line winds. It is a statistical fact that most people are killed or injured by flying debris. We can't stop all of it, but by building according to standard building codes, it can stop "some" of it. The less that comes loose, the safer our customers will be.
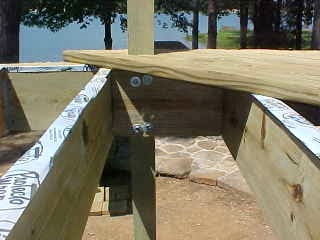
Once we start framing, we will often use a double outer joist as shown in the next picture, with not just two, but FOUR bolts anchoring them to the support posts. Think about it: if a ledger requires two bolts every two feet, why would an outer joist be expected to get by with only two bolts for up to eight feet of length? It's mathematically impossible! On the other hand, you just don't have enough room for that many bolts on a 4-inch post...so that's why we double up where we can!
Joists are sized according to standard building code for the type pf wood was well as the span between supports. Different woods have different strength characteristics and all this information can be found in many building manuals as well as online. All it takes is looking for it and reading it.
Joists are then anchored with galvanized joist hangers of the proper size and with the proper fasteners...or when that isn't possible, with coated deck screws placed every two inches of joist height, from both sides of the joists. And just as importantly, we covered the tops of ALL horizontal surfaces with the same special tape that we applied to the flashing. This assures that any water that "wicks" in between the deck boards and the joists will not just set there and rot the joists, but drain off. Deck boards can easily be replaced, but if joists go bad, it usually requires a whole new deck. With our system, you can change deck boards several times before the joists themselves would go bad, thereby extending the life of the deck to as much as 50 years or more.
Even the tops of posts are covered with the special tape, especially where top rails have to be joined, so that no water can seep down into the grain and rot the post.

Bridging (the braces installed between joists to prevent warping) are also installed when the span requires it (again by code) and those pieces are also covered with the special tape.

As always, angles are measured accurately (to within half a degree) and pieces cut to exact angles to fit with the structure to which they are attached. Shown below is the junction where the main frame has to change directions and become flush with the front of the sun room.

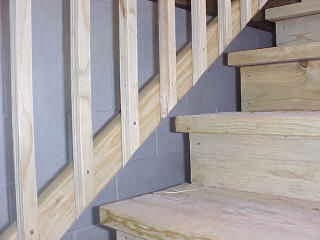
On this deck, the stairway had to be recessed into the deck so that it would come out at the right place on the flagstone patio below. But we did not rely on the flagstone to support the stairs. We always poured a flat slab of concrete at the bottom of our stairs for the bottom of the stringers to set on. Also, on anything over 3-feet wide, we always used three stringers for extra strength...not just two. All of our stairs were engineered so that no riser was more than 7-inches in height, nor the tread any less than 11-1/4-inches deep, and with equal spacing from the first step to the last.

Railings were always custom cut to fit the exact dimensions and angles required, while maintaining the spacing required by code for safety. Any deck surface that is more than 30-inches above grade at any point requires a railing, and that railing must be such that a round sphere of 4-inches in diameter cannot pass through it or under it, nor a sphere of 6-inches in diameter fit through the railing at the corners of the stair risers and treads. Too many small children and animals have been killed or injured because of thoughtless people ignoring these rules!
Although there are many styles for railings, they should all look professional, with properly measured and mitered corners. In this case, the customer wanted a railing that was wide enough to set drinks or plates on, for when they entertain, so we used 2 x 8's for the top rail.

All wood on a deck should be installed with the crown up. The crown is the "high point" of the board when laying flat. If you look at the end grain, and it looks like a frown, then you have the board right. If it looks like a smile, that is wrong, as the board can warp with a low center and trap rainwater on it, rather than draining it away. We often run across boards that are cut from near the center of a tree and the grain changes direction from one end to another. If that happens, we try to use the board where it can be cut to shorter lengths, so the grain can be turned the proper direction.
Spacers should always be used under the center of any section of railing over 6-feet. Besides normal sag from the weight of the railing, you never know who might decide to sit on the railing. Without proper support it can stretch the ends away from the posts and cause it to give way and possibly injure someone.

In the case of these decks, the owner wanted the boards in something other than the usual "right-angle" design, so we installed the boards at a 45 degree angle, which adds extra visual interest to the looks of the deck.

In order for the frame to accommodate the angled deck boards, it had to be designed in such a way that it didn't end up parallel to the deck boards. You can see that transition in one of the photos above, before the extra bridging was installed.

The finished stairway not only fits in well with the deck, but is visually appealing as well as solid and code compliant. All corners are mitered, and spindles wrapped with even spacing so as not to disturb the "flow". On nearly all of our railing designs we prefer to keep the spindles outside of the support posts, so that they can "flow" on past without having to have to the spacing readjusted every time it meets a post. This is a much more attractive way of finishing off a properly designed deck.

In our next post, we will discuss the smaller of the two decks on this property. Both were built using the same techniques and design, but it had a few challenges along the way. Stick around.
No comments:
Post a Comment